Side Dishes
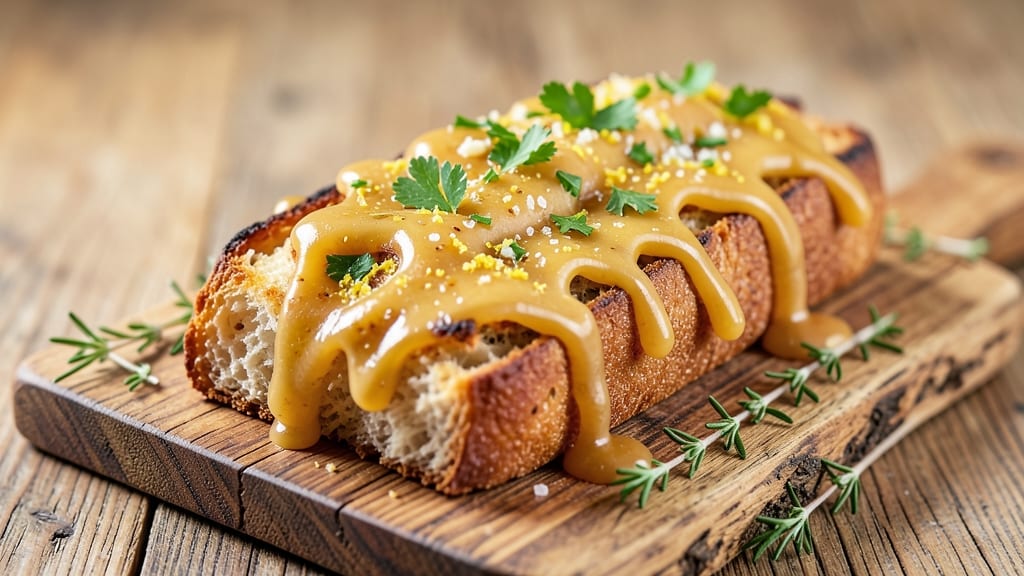
This authentic garlic bread recipe delivers the crispy crust and rich, aromatic garlic butter you crave—without the greasy mess. 🔥 The secret lies in a foil-sealed technique that traps steam for a perfectly golden exterior while keeping the interior tender.
I've perfected this method after years of testing, ensuring every bite has that restaurant-quality crunch and flavor.
What sets this recipe apart is the use of garlic paste instead of minced garlic, which infuses the butter more evenly and avoids burning. Fresh parsley and thyme add bright, herby notes that balance the garlic's intensity, while a touch of lemon zest keeps the flavors fresh.
The dough (or store-bought bread) gets brushed with this fragrant mixture and baked until the crust is irresistibly crisp.
By the time it emerges from the oven, you'll have garlic bread with a crispy, caramelized crust that shatters at every bite and a buttery, garlicky center that melts in your mouth.
The foil-sealing method ensures the bread stays warm and moist, making it ideal for serving alongside marinara, pasta, or as a stand-alone appetizer. It's the kind of garlic bread that disappears faster than you can say "more butter."
This recipe works with both homemade dough and store-bought baguettes, giving you flexibility for any occasion. Whether you're feeding a crowd or treating yourself to a cozy meal, the results are consistently impressive. Let's get started!
Ingredients for authentic garlic bread
Pantry staples plus a few fresh touches for that restaurant-quality garlic bread.
| Ingredient | Amount | Notes |
|---|---|---|
| Unsalted Butter 🧈 | ½ cup | Softened but not melted |
| Garlic Paste 🧄 | ¼ cup | Smooth, not chunky |
| Fresh Parsley 🌿 | ¼ cup | Finely chopped leaves |
| Fresh Thyme Leaves 🌿 | 1 tbsp | Or 1 tsp dried thyme |
| Lemon Zest 🍋 | 1 tbsp | From 1 lemon |
| Salt 🧂 | 1 tsp | Kosher or sea salt |
| Black Pepper 🌶️ | ½ tsp | Freshly ground preferred |
| Baguette 🍞 | 1 whole | French or Italian style |
| Olive Oil 🫒 | 1 tbsp | For brushing bread |
| Aluminum Foil 📄 | 1 sheet | Heavy-duty preferred |
| Garlic Cloves 🧄 | 2 cloves | For optional fresh garlic |
| All-Purpose Flour 🌾 | 1 cup | For homemade dough |
| Active Dry Yeast 🍞 | ¼ tsp | For homemade dough |
| Warm Water 💧 | ¼ cup | For yeast activation |
| Granulated Sugar 🍚 | ½ tsp | For yeast activation |
The garlic paste is the game-changer here—Trader Joe's or Whole Foods carry the best smooth kind. If you can't find it, blend 2 fresh garlic cloves with 1 tbsp olive oil for a quick substitute. Fresh thyme and parsley make all the difference, so grab them from the grocery store's produce section (they're usually near the herbs). The butter should be room temperature but not melted—this ensures it spreads evenly without making the bread soggy. For the dough, if you're making it from scratch, active dry yeast is key—check the expiration date to make sure it's fresh.
No garlic paste? Fresh garlic cloves minced with olive oil works, but you'll need to roast them first to avoid that raw garlic bite. Short on parsley? Fresh basil at half the amount gives a different but still delicious flavor. The foil-sealing method is non-negotiable for that crispy crust—heavy-duty foil is worth the extra penny. For the baguette, French-style is ideal, but any crusty bread will work. If you're making the dough, let it rise in a warm spot for 1-2 hours until it's puffy and doubled in size.
The garlic butter mixture keeps for 3 days in the fridge if stored in an airtight container. The dough, if made fresh, can be shaped and refrigerated for 24 hours before baking. For the foil-sealed bread, it stays warm and crispy for about 20 minutes after baking—perfect for serving at the table. If you're prepping ahead, bake the bread without the foil seal and wrap it in foil to reheat later. Just brush with a little olive oil before serving to restore that crispy texture.
Why You'll Love This Recipe
- No-Fuss Spread: I swear by this—just slather butter, mix in the garlic paste, and sprinkle herbs. No fancy techniques, no stress. The lemon zest ties it all together without extra work.
- Layered Flavor Bomb: That first bite of crispy bread with herby, garlicky butter? It’s like a flavor party in your mouth. The thyme and parsley add freshness, while the lemon zest keeps it bright—not heavy.
- Weeknight & Weekend Star: Make a big batch for movie night, or slice it up for a picnic. It reheats beautifully, so it’s my go-to for lazy Sundays or quick weeknight dinners when I’m too tired to cook.
- Budget Magic: Rich, restaurant-quality taste without breaking the bank. A single loaf, a stick of butter, and a few herbs stretch to feed four. Honestly, it’s the kind of dish that makes me feel fancy without the price tag.
Step-by-step instructions for authentic garlic bread
Here's how to make restaurant-quality garlic bread with that perfect crispy crust and foolproof foil-sealed garlic butter.
👨🍳 Step 1: Make the Homemade Dough (Optional for Extra Authenticity)
In a large bowl, whisk together the 1 cup all-purpose flour, 0.5 tsp granulated sugar, and 1 tsp salt. Make a well in the center and add the 0.25 tsp active dry yeast. Pour in the 0.25 cup warm water and mix until combined. Here's the thing—this dough is simple but makes all the difference for that authentic texture.
Knead the dough for about 5 minutes until smooth and elastic. It should feel slightly tacky but not sticky. Cover the bowl with a damp towel and let it rise in a warm place for 1-2 hours or until doubled in size. This step is where the magic happens—proper fermentation develops flavor and creates that light, airy texture we want in our bread.
🍳 Step 2: Prepare the Garlic Butter Mixture
In a medium bowl, combine the 0.5 cup softened unsalted butter, 0.25 cup garlic paste, 0.25 cup finely chopped fresh parsley, 1 tbsp fresh thyme leaves, 1 tbsp lemon zest, 1 tsp salt, and 0.5 tsp black pepper. Mix everything together until it's completely smooth and well combined.
I like to press the mixture through a fine-mesh sieve to ensure the garlic paste is evenly distributed and there are no lumps. This creates that perfect, spreadable consistency we want for our garlic butter. If you're feeling fancy, you can add the 2 minced garlic cloves here too for extra fresh garlic flavor.
🥘 Step 3: Prep the Baguette (Store-Bought or Homemade)
If using store-bought baguette, preheat your oven to 375°F and slice the baguette in half lengthwise, cutting all the way through but leaving it connected at the ends so it stays in one piece. For homemade dough, shape it into a baguette and bake until golden brown before slicing.
Brush the cut sides of the baguette with the 1 tbsp olive oil using a pastry brush. This creates a barrier that helps the garlic butter stick better and adds that extra crispiness. Don't skip this step—it makes a huge difference in the final texture.
🔥 Step 4: Assemble and Bake to Crispy Perfection
Spread the garlic butter mixture evenly over both halves of the baguette, making sure to get it all the way to the edges. The reason we use foil here is to create that perfect balance—it traps steam for moisture while still allowing the bread to crisp up beautifully.
Place the baguette on a baking sheet lined with the aluminum foil, shiny side up. Bake for 10-12 minutes until the edges are deep golden brown and the bread is heated through. Watch closely in the last few minutes to prevent burning—you want that perfect crispy crust without any charring.
⏰ Step 5: Rest and Serve Immediately
Remove the garlic bread from the oven and let it rest for 2-3 minutes before serving. This resting period allows the bread to set slightly and makes it easier to slice without falling apart. The foil helps keep it warm while it rests.
Slice into 1-inch pieces and serve immediately while still warm and crispy. The garlic butter should be melted and gooey, with that perfect balance of garlic, herbs, and lemon zest. Real talk: this is where all your hard work pays off—every bite should be a perfect combination of crispy crust and flavorful, melted garlic butter.
Pro Tips For Making Authentic Garlic Bread
- Melt Butter Slowly: Don’t rush the butter—let it melt gently over low heat until it’s just liquid, not foaming. I learned this the hard way: if you crank the heat, the butter burns before the garlic gets a chance to bloom, and you end up with bitter, charred flavor instead of that rich, aromatic base.
- Minimize Garlic Paste Moisture: Pat that garlic paste dry before mixing it into the butter. Even a little excess liquid dilutes the flavor and makes the bread soggy. I used to just scoop it straight from the jar, and the bread always tasted watered down—now I press it between paper towels first.
- Toast Parsley Last: Add the fresh parsley and thyme after the garlic has cooked down and the butter is fragrant. If you toss them in too early, they’ll turn bitter from the heat. My grandmother swore by this, and she was right: the herbs should stay bright and fresh-tasting, not wilted.
- Use Lemon Zest Early: Mix the lemon zest into the butter before spreading it on the bread. The citrus brightens the garlic flavor as it cooks, not just as a garnish. I was skeptical until I tried it—the zest infuses into the butter, giving the bread a subtle, balanced tang that cuts through the richness.
Common mistakes when making this dish
Overcooking the Bread
I’ve seen this happen more times than I can count—baguettes that turn into sad, charred hockey pucks instead of crispy, golden perfection. The key is timing: once the edges hit deep golden brown, pull it out immediately.
Most ovens run hot, so 10-12 minutes at 375°F is your sweet spot. Set a timer and watch closely in the last 2 minutes—that’s when things go from "perfect" to "disaster." 🔥
Skipping the Olive Oil Brush
This is a game-changer that so many people miss. Brushing the baguette with 1 tablespoon olive oil before adding the garlic butter creates a barrier that prevents sogginess and helps the butter adhere better.
Without it, your garlic butter will pool in the cracks instead of coating evenly. Pro tip: use a pastry brush for clean, even strokes.
Using Raw Garlic Instead of Paste
Fresh garlic cloves can burn easily, leaving your garlic bread with a bitter, raw taste instead of the smooth, mellow flavor we want. That’s why I recommend garlic paste—it distributes evenly and cooks through without turning acrid.
If you must use fresh, roast the cloves first (wrap them in foil and bake at 400°F for 10 minutes) to mellow their intensity.
Not Sealing with Foil Properly
The foil isn’t just for convenience—it’s what creates that restaurant-quality texture. Place the baguette on the foil with the shiny side up to trap steam and keep the bread moist while the crust crisps.
If you skip this or use the wrong side, you’ll end up with dry, uneven cooking. I like to crimp the edges lightly to seal it like a little packet. ✨
Overmixing the Dough
If you’re making dough from scratch, resist the urge to overwork it. Kneading for more than 5-6 minutes develops too much gluten, which makes the bread dense instead of light and airy.
The dough should be smooth but still slightly tacky—like a soft ball of Play-Doh. Overmixing is a common mistake that ruins the texture before you even get to the garlic butter.
Serving Too Early
Freshly baked garlic bread needs a 2-3 minute rest before slicing. Cutting it too soon means the bread will fall apart at the table, and the garlic butter will ooze out everywhere.
This brief pause lets the structure set so you get clean slices with that perfect crispy exterior. Trust me, those extra minutes pay off in the long run. 💪
Nutrition facts
Frequently asked questions
Can I make this garlic bread without fresh herbs?
If you don't have fresh parsley or thyme, use 1 teaspoon dried parsley and 0.5 teaspoon dried thyme instead. For extra flavor, add 1/4 teaspoon red pepper flakes to give it a subtle kick. The garlic paste will still be the star, so don't worry about missing the herbs completely.
How do I reheat leftover garlic bread?
Leftover garlic bread loses its crispiness, but you can revive it! Wrap slices in aluminum foil and warm in a 350°F oven for 5-7 minutes. For extra crispiness, brush with a little olive oil before reheating. If using a toaster, keep the heat low-medium to avoid burning the butter.
What's the best bread to use besides a baguette?
Any crusty bread works well! Try a ciabatta loaf (it's extra airy), focaccia (for a heartier texture), or even a brioche roll (richer flavor). Avoid soft breads like sandwich loaves—they won't hold up to the garlic butter. Slice lengthwise like a baguette for maximum crispiness.
Can I make this gluten-free?
Yes, but with adjustments. Use a gluten-free bread mix or a sturdy GF baguette, and replace the butter with gluten-free butter or olive oil. The dough won't rise as much, so bake at 375°F for 12-15 minutes until golden. For extra structure, brush with olive oil before adding the garlic mixture.
Why does my garlic bread turn out greasy?
Greasy garlic bread usually means too much butter or improper baking. Use exactly 0.5 cup butter (don't eyeball it!) and bake until the edges are golden, not just melted. If it's still greasy, try baking for 1-2 extra minutes**—the heat will help crisp the butter. For next time, spread the butter thinner before baking.