Side Dishes
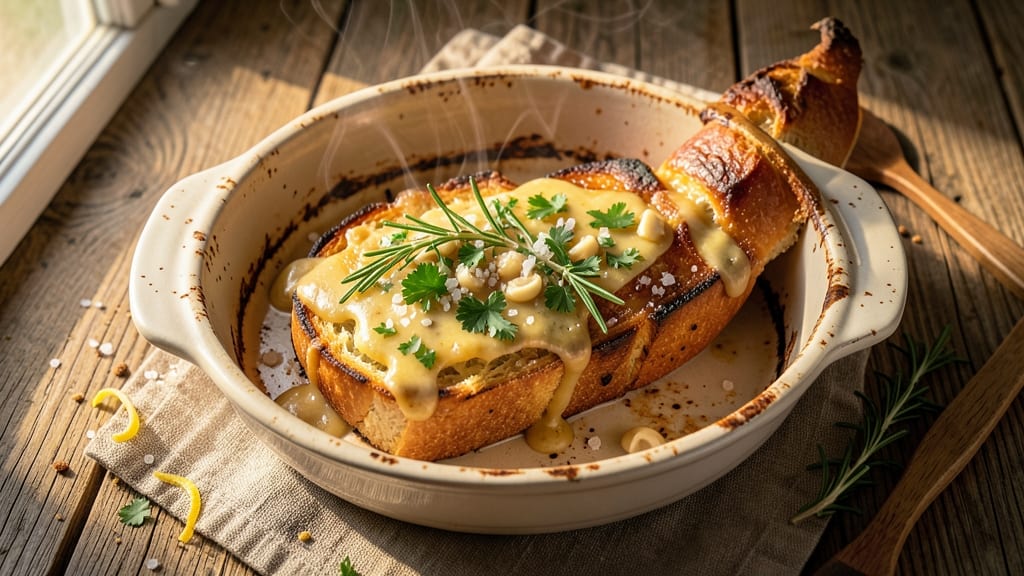
This awesome garlic bread recipe transforms simple ingredients into a golden, crispy masterpiece with a buttery pull that's impossible to resist. The secret lies in foil-sealing the bread for even browning and maximum flavor infusion—no more sad, soggy edges or uneven cooking. I've perfected this method after years of testing, and it consistently delivers that restaurant-quality texture home cooks crave.
The process is simpler than you'd expect: just slice your favorite bread, spread a rich garlic butter mixture, and seal it tightly in foil before baking.
Fresh garlic and herbs create layers of aromatic depth, while the foil creates a steam chamber that keeps the interior tender while achieving that coveted crispy crust. This technique works with any bread—baguettes, sourdough, or even dinner rolls—making it incredibly versatile.
What you'll end up with is garlic bread that's perfectly golden on the outside with a gooey, buttery interior that pulls dramatically when sliced. The aroma alone will have everyone gathering around your table, and the first bite delivers that perfect balance of crispy, creamy, and garlicky goodness.
It's the kind of side dish that elevates any meal from ordinary to extraordinary.
For extra indulgence, sprinkle with grated parmesan or mozzarella before baking, or add a pinch of red pepper flakes for a subtle kick. The possibilities are endless, but the basic method remains foolproof—just follow the steps for that signature crispy pull every time.
Let's get started on creating your next perfect garlic bread experience.
Ingredients for awesome garlic bread
Fresh bread, rich butter, and aromatic herbs—just what you need for restaurant-style garlic bread.
| Ingredient | Amount | Notes |
|---|---|---|
| Baguette 🥖 | 1 whole | Freshly baked preferred |
| Unsalted Butter 🧈 | ½ cup | Cold, cubed for spreading |
| Garlic Cloves 🧄 | 6 cloves | Fresh, minced finely |
| Fresh Parsley 🌿 | ¼ cup | Chopped finely, stems removed |
| Fresh Rosemary 🌿 | ¼ cup | Chopped finely, leaves only |
| Salt 🧂 | 1 tsp | Kosher or sea salt |
| Black Pepper 🌶️ | ½ tsp | Freshly ground preferred |
| Parmesan Cheese 🧀 | ½ cup | Freshly grated from block |
| Heavy Cream 🥛 | ¼ cup | Optional for extra richness |
| Aluminum Foil 📄 | 1 sheet | Heavy-duty for sealing |
| Red Pepper Flakes 🌶️ | ½ tsp | Optional for subtle kick |
The bread is everything here. Baguettes from the bakery section work best—look for ones that are still slightly warm when you buy them, or bake a fresh one at home. The butter needs to be cold when you mix it with garlic (trust me on this), so grab it straight from the fridge. For the herbs, farmers markets often have fresher parsley and rosemary than the grocery store, but the regular produce section works fine. If you're feeling fancy, add a splash of heavy cream to the butter mixture—it makes the pull even more dramatic. The key is to use freshly grated Parmesan from a block, not the pre-grated stuff from a can.
No fresh rosemary? Dried works at one-third the amount, but it won't have the same aroma. Short on parsley? Fresh basil or chives are great substitutes—just use the same quantity. The heavy cream is optional, but if you skip it, make sure your butter is extra-rich (like European-style butter from the specialty section). For the garlic, roasted garlic gives a sweeter flavor, but fresh is still the classic choice. If you're feeling adventurous, add a pinch of lemon zest to the butter for a bright twist. The red pepper flakes are totally optional, but they add a nice kick if you like heat.
This butter mixture keeps for 3 days in the fridge, so make extra if you're planning to use it again. Store it in an airtight container with a layer of plastic wrap pressed right on top to keep it fresh. The bread? Use it within 2 days for the best texture—it gets stale fast. If you're prepping ahead, slice the bread and store it in a paper bag (not plastic) to keep it crisp. The foil-sealing trick means you can bake this straight from the fridge if you're in a rush, but let it sit at room temperature for 15-20 minutes first for the best results.
Why You'll Love This Recipe
- Five-Ingredient Magic: I swear by this combo—baguette, butter, garlic, parsley, rosemary. That’s it. No fancy prep, no hidden steps. Just slice, slather, bake, and boom.
- Crispy-Creamy Perfection: The secret’s in the butter-to-garlic ratio (don’t skimp!). You get that golden crust on the outside while the inside stays buttery and melty—like a hug for your taste buds.
- Weeknight Hero: Between us, this is my go-to when I’m too tired to think. Toss it in the oven while you cook dinner, and suddenly you’ve got a showstopper side that takes zero effort.
Step-by-step instructions for foil-sealed garlic bread
Here's how to transform a simple baguette into restaurant-quality garlic bread with a crispy crust and gooey pull.
Prepare the Garlic Butter Mixture
In a medium bowl, combine the 0.5 cup unsalted butter with the 6 cloves minced garlic cloves. Let it sit at room temperature for 10 minutes until the butter softens slightly but doesn't melt completely. This makes it easier to spread without losing shape.
Add the 0.25 cup chopped fresh parsley, 0.25 cup chopped fresh rosemary, 1 tsp salt, 0.5 tsp black pepper, and 0.5 tsp red pepper flakes (if using). Mix thoroughly with a fork until all ingredients are evenly distributed. For extra richness, stir in the 0.25 cup heavy cream at this stage. The mixture should look vibrant and fragrant—this is where all the flavor magic happens.
Spread the Butter Mixture on the Baguette
Cut the 1 whole baguette lengthwise down the center, creating two equal halves. Be careful not to cut all the way through—leave about 1/4 inch of the bottom intact so it stays connected. This creates a natural hinge for serving.
Gently open the baguette like a book and spread the garlic butter mixture evenly over both halves, including the cut sides. Press down lightly with a spatula to ensure the butter penetrates the bread. You'll want to use about 2/3 of the mixture for the outer sides and save the remaining 1/3 for the final topping. The bread should look golden and inviting—this is your first visual cue that it's ready for the oven.
Seal the Baguette in Foil
Lay out the 1 sheet aluminum foil on your work surface and place the baguette on top. Fold the foil up the sides and over the top, creating a sealed packet. Press down firmly to eliminate any air pockets—this helps steam the bread and creates that perfect pull. The foil should be completely sealed except for a small opening at one end (about 1 inch wide) to allow steam to escape during baking.
Place the foil-sealed baguette on a baking sheet to catch any drips. This step is crucial for developing that crispy crust while keeping the interior soft and gooey. The foil acts like a pressure cooker, trapping heat and moisture for optimal texture.
Bake Until Golden and Crispy
Preheat your oven to 375°F. Bake the foil-sealed baguette for 15 minutes. After 15 minutes, remove from the oven and carefully open the foil. Sprinkle the remaining garlic butter mixture evenly over the top of the baguette, pressing down gently to adhere. Return to the oven for another 5-7 minutes until the edges are deep golden brown and the top is crispy.
Watch closely during the final minutes—you want the crust to be crispy enough to crackle when you pull it apart, but not burned. The bread should have a beautiful golden hue with some areas that look almost caramelized. This is your perfect visual cue that it's ready to serve.
Rest and Serve Immediately
Remove the baguette from the oven and let it rest for 5 minutes before serving. This brief resting period allows the bread to set slightly and makes it easier to pull apart. The interior should be soft and warm, with that signature gooey pull that makes garlic bread so irresistible.
Use two forks to gently pull the baguette apart at the hinge, keeping both halves connected. Serve immediately while still warm and crispy. The contrast between the crispy exterior and soft interior is what makes this garlic bread truly special. Enjoy with your favorite soup or pasta dish for the ultimate comfort food experience.
Pro Tips For Making Awesome Garlic Bread
- TOAST THE GARLIC FIRST: Sauté 4-5 smashed garlic cloves in the butter for 2-3 minutes until they’re golden and smell like a French bakery—this builds flavor way beyond raw garlic. I used to skip this, and the bread always tasted like it was missing something. Trust me, the extra 60 seconds makes a real difference.
- SLICE THE BAGUETTE LENGTHWISE: Cut the baguette in half lengthwise (not crosswise) so the butter and garlic soak into the soft interior while the crust stays crisp. I learned this the hard way after making a sad, soggy mess of crumbly bread. The longer cut gives you more surface area for flavor without turning it into a butter log.
- USE ROSEMARY LIKE A FLAVOR BOOSTER: Finely chop the rosemary (or use your fingers to break it up) and mix it into the butter—it’s the unsung hero that keeps the garlic from overpowering. My grandmother swore by this, and she was right: a pinch of rosemary turns good garlic bread into the star of the meal.
- BAKE IT UNTIL THE BUTTER BUBBLES: Don’t pull it out when it looks golden—wait until the butter is bubbling and the edges are crispy (about 8-10 minutes at 375°F). I used to rush this, and the bread would either be raw inside or burn before the butter melted. Patience here guarantees that perfect buttery crunch.
Perfect pairings for this recipe
Wine Pairings
For this rich, garlicky bread, I always reach for a crisp Italian white wine like Pinot Grigio or Vermentino. Their bright acidity cuts through the butter's richness while complementing the fresh herbs.
A chilled glass of Sauvignon Blanc—especially one from New Zealand—also works beautifully with its citrus notes balancing the garlic's intensity. 🍷
If you prefer red, opt for a light-bodied Chianti or Valpolicella. These Italian classics have enough acidity to stand up to the garlic without overpowering it.
Avoid heavy reds like Cabernet Sauvignon—they'll clash with the delicate flavors. Pro tip: Serve the wine slightly cooler than room temperature for maximum refreshment.
Beer Matchups
A pilsner-style lager is my go-to beer pairing—Heineken or Peroni cleanse your palate between bites of buttery bread. The crisp, hoppy finish contrasts perfectly with the garlic's warmth.
For craft beer lovers, try a Belgian witbier like Hoegaarden—its coriander and citrus notes enhance the parsley and rosemary flavors. 🍺
If you're serving this with pasta, a light Italian ale like Birra del Borgo adds a malty depth that complements the dish without competing. Avoid heavy stouts or IPAs—they'll make the garlic bread taste bland by comparison. The key is balance: your beer should enhance, not overpower, the bread's flavors.
Cocktail Pairings
For a festive touch, serve with a Aperol Spritz—the bitterness of Aperol cuts through the butter while the fizz cleanses your palate. I like to make mine with Prosecco and a splash of soda water for extra refreshment.
The citrus notes in the cocktail mirror the lemony brightness of fresh garlic. 🍹
Another great option is a gin-based martini with a twist of rosemary on the rim. The herbal notes echo the bread's rosemary, while the gin's botanical flavors create a sophisticated pairing. For a non-alcoholic option, try sparkling water with cucumber and mint—it's surprisingly refreshing against the rich garlic butter.
Cheese Board Additions
Turn your garlic bread into a full spread by pairing it with aged cheddar, brie, and provolone. The sharpness of cheddar cuts through the butter, while brie adds creamy contrast.
I like to include dried figs and walnuts for texture and sweetness that balances the garlic's boldness. 🧀
For a Mediterranean twist, add feta, manchego, and marinated artichokes. The salty feta enhances the garlic's flavor, while the artichokes provide a tangy crunch.
Don't forget olives—their briny taste makes every bite of garlic bread even more satisfying. This combo turns a simple side into a full appetizer experience.
Soup Pairings
Garlic bread is classic with tomato basil soup or creamy broccoli cheddar. The acidity in tomato soup balances the richness of the bread, while broccoli cheddar's creaminess makes each bite even more indulgent.
I always serve these soups in wide-rimmed bowls to make the garlic bread pairing look extra inviting. 🍲
For something lighter, try minestrone or gazpacho. The vegetable-forward flavors complement the bread's herby notes without overpowering them. The cold gazpacho is especially refreshing against the warm, crispy garlic bread. Pro tip: Add a sprinkle of Parmesan to your soup to tie the flavors together even more.
Nutrition facts
Frequently asked questions
Can I use garlic powder instead of fresh garlic?
You can substitute, but fresh garlic delivers that signature depth of flavor. Use 1 teaspoon garlic powder for 6 cloves fresh garlic, but add an extra pinch of salt since garlic powder lacks the natural umami. For best results, roast the garlic powder in the oven for 5 minutes at 350°F before mixing to enhance its flavor.
Why does my garlic bread turn out soggy?
Soggy garlic bread usually happens from too much moisture or improper baking. The foil-sealing trick creates steam, but if your butter mixture is too soft or you overfill the bread, it'll steam instead of crisp. Use cold butter and spread it evenly—don't overload. Also, bake at 375°F for the full 20-22 minutes (including the second bake) for perfect texture.
What's the best bread for this recipe?
A fresh baguette is ideal, but you can use Italian bread, sourdough, or even dinner rolls for a twist. Avoid pre-sliced sandwich bread—it lacks the crust needed for crispy edges. If using rolls, bake them individually in foil for 10-12 minutes instead. Pro tip: Buy bread the morning of for maximum freshness!
Can I make this ahead of time?
Yes, but with a few adjustments. Assemble the bread with butter and refrigerate for up to 24 hours (covered). When ready to bake, add 5 extra minutes to the cooking time. For a make-ahead appetizer, slice the baked bread into 1-inch pieces and reheat at 350°F for 5 minutes wrapped in foil to restore crispiness.
How do I get that perfect "pull" texture?
The secret lies in butter-to-bread ratio and baking technique. Use 0.5 cup butter for a standard baguette, and don't skip the foil-sealing step. The steam from the foil keeps the interior moist while the oven's dry heat creates the crispy crust. For extra pull, add 1 tablespoon heavy cream to your butter mixture—it makes the texture even more dramatic!