
Side Dishes
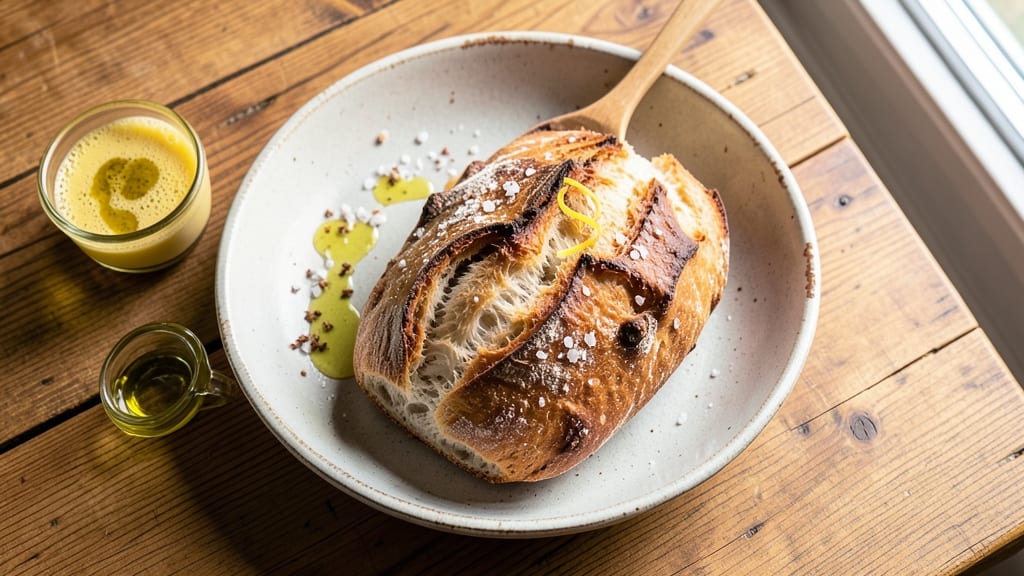
This airy ciabatta bread recipe delivers the signature open crumb structure and light-as-air texture that makes ciabatta irresistible. The secret lies in a precise balance of hydration and time—no kneading required, just patience and attention to detail.
I've perfected this method over years of baking, ensuring every loaf emerges with those coveted air pockets and crispy crust.
The dough comes together with just five simple ingredients: high-gluten flour for structure, yeast for lift, salt for flavor, and water for that signature open crumb.
The key technique is allowing the dough to rest for 12 hours before shaping and baking, which develops gluten strands and creates those signature air pockets. This no-knead approach makes it accessible even for beginners while delivering professional results.
By the time you pull this bread from the oven, you'll have golden-brown loaves with crispy crusts and an interior so light it practically dissolves on your tongue. The aroma alone will have everyone gathering around your kitchen. This recipe builds confidence—once you master it, you'll never buy ciabatta again.
Perfect for serving with soups, dipping in olive oil, or using as a base for sandwiches. The method scales beautifully, so you can bake one loaf for a quick meal or three for a crowd.
Let's get started on creating bread that tastes like it came from an authentic Italian bakery.
Ingredients for airy ciabatta bread
Five ingredients transform into golden, airy ciabatta loaves with crisp crusts.
| Ingredient | Amount | Notes |
|---|---|---|
| High-Gluten Flour 🌾 | 4 cups | King Arthur or Caputo for best results |
| Active Dry Yeast 🍞 | ¼ oz | Or 2.25 tsp, ensure fresh |
| Fine Sea Salt 🧂 | 1 ½ tsp | Diamond Crystal preferred |
| Lukewarm Water 💧 | 1 ½ cups | 105-110°F for ideal activation |
| Olive Oil 🫒 | 1 tbsp | Extra-virgin for flavor |
The high-gluten flour is non-negotiable here—King Arthur or Caputo create that signature open crumb. I grab mine from King Arthur Baking or the bulk bins at Whole Foods. Yeast freshness matters: if it's past its expiration, toss it. The water temperature is critical—too hot kills yeast, too cold slows fermentation. 105-110°F is perfect. For the salt, Diamond Crystal dissolves more evenly than table salt, giving cleaner flavor. The olive oil? Use something fruity—California avocado oil works too, but EVOO has that authentic Italian touch.
No high-gluten flour? Bread flour plus 1 tbsp vital wheat gluten gets you close. Short on yeast? Instant yeast at same amount works fine. The olive oil can be swapped for avocado or vegetable oil, but avoid strong-flavored oils like walnut. For a vegan version, use vegan olive oil or skip it entirely. The water can be sparkling water for extra lift, but regular works just as well. If your kitchen's humid, add 1 tsp cornmeal to the dough to prevent stickiness.
This dough needs 12 hours at room temperature to develop flavor and gluten. Cover with a damp towel to prevent drying. For shaping, use a banneton or bowl lined with a floured towel. Baked loaves keep well at room temperature for 2 days, wrapped in a cloth. Freeze shaped loaves (before baking) for up to 3 months
Why You'll Love This Recipe
- No-Knead Magic: I swear by the high-gluten flour here—it does all the work. Just mix, let it rise, and boom, you’ve got that signature airy texture without a single hand cramp.
- Salt & Olive Kiss: That fine sea salt and olive oil combo? It’s the secret weapon. The crust gets crispy, the inside stays pillowy, and every bite tastes like a little Mediterranean vacation.
- Weeknight Hero: Toss a loaf in the oven while you prep dinner—it’s ready before the pasta boils. Honestly, I’ve used it for toast, sandwiches, and even garlic bread scraps (no judgment).
- Budget-Friendly Staple: Five ingredients, endless uses. A single batch stretches across breakfasts, lunches, and snacks, and the yeast makes it cheaper than store-bought. My wallet thanks me every time.
Step-by-step instructions for cloud-light ciabatta loaves
Let's make this no-knead dough so effortless you'll wonder why you ever baked bread the hard way.
Activate the Yeast with Lukewarm Water
In a large mixing bowl, combine the 1.5 cups lukewarm water (about 105-110°F) with the 0.25 oz active dry yeast. Let it sit for 5-10 minutes until you see bubbles forming on the surface and a frothy foam appears. This proves your yeast is alive and ready to work its magic.
Here's the thing—if you don't see bubbles within 10 minutes, your yeast might be dead. Toss it and start fresh with a new packet. I've learned this lesson the hard way after waiting an hour for nothing but flat water. The water temperature matters too; if it's too hot (120°F+), you'll kill the yeast instantly.
Mix the Dough Until Shaggy
Add the 4 cups high-gluten flour and 1.5 tsp fine sea salt to the yeast mixture. Stir with a wooden spoon until a rough dough forms—it'll look shaggy and uneven, and that's exactly what we want. At this stage, the dough should pull away from the sides of the bowl but still feel quite wet.
Now add the 1 tbsp extra-virgin olive oil and mix it in. The dough should feel tacky but not sticky to the touch. If it's too dry, add 1 tablespoon water at a time until it reaches that perfect shaggy consistency. This high-gluten flour is key—it develops that signature open crumb structure without needing kneading.
Let the Dough Rest and Develop
Cover the bowl with a damp kitchen towel or plastic wrap and let the dough rest at room temperature for 1 hour. You'll see it puff up slightly and develop small bubbles on the surface. This resting period allows the gluten to relax and the yeast to activate fully.
Don't be tempted to peek or stir during this time—you'll deflate the bubbles and set back your progress. I like to set a timer so I don't forget. The dough should roughly double in size during this hour. If your kitchen is cold, you might need to extend this to 1.5 hours, but don't let it exceed 2 hours or the yeast could overproof.
Shape and Proof the Dough
Lightly flour a clean work surface and gently transfer the dough onto it. Using wet hands, stretch and fold the dough in half, then fold it back on itself—almost like you're making a letter. Do this 3-4 times total, rotating the dough each time to ensure even development. This stretching helps create those signature air pockets.
Shape the dough into a loose log, then transfer it to a lightly oiled 9x5-inch loaf pan. Cover with the damp towel again and let it proof for another 1-1.5 hours until it's puffy and has risen about halfway up the sides of the pan. The dough should feel springy when pressed gently—it should leave a slight indent but not flatten completely.
Bake for Maximum Airiness
Preheat your oven to 400°F with a Dutch oven inside for 30 minutes. This step is crucial for creating that crispy crust and trapping steam. Carefully transfer the dough (still in the pan) into the hot Dutch oven and bake covered for 25 minutes.
After 25 minutes, remove the lid and bake uncovered for another 10-15 minutes until the bread is golden brown and sounds hollow when tapped on the bottom. The internal temperature should reach 190-200°F. Let the bread cool in the pan for 10 minutes before transferring to a wire rack to cool completely. This cooling period prevents the bread from becoming gummy inside.
Pro Tips For Making Airy Ciabatta Bread
- STRETCH THE DOUGH LONG: I learned this the hard way—skipping the 10-minute stretch after shaping makes the crumb dense instead of open. Grab the dough with both hands and pull it toward you in one smooth motion, then fold it over itself. Repeat 5-6 times until it resists but doesn’t snap. That’s how you get those signature air pockets.
- WEIGH THE FLOUR PRECISELY: High-gluten flour is finicky—eyeballing it leads to either a gummy mess or dry, crumbly bread. Use a kitchen scale and stop when you hit the weight, then sift it directly into your mixing bowl. Packing or scooping adds moisture unpredictably, and this dough doesn’t forgive sloppiness.
- DON’T OVERPROOF THE LOAF: The dough’s ready when it springs back slowly when poked—not immediately. Overproofing (even by 15 minutes) collapses the structure, leaving you with a sad, flat loaf. If your kitchen’s warm, set a timer for 45 minutes max after the first rise, then check visually. Better to underproof than risk it.
- USE A BASKET, NOT YOUR HANDS: Dust your banneton (or bowl) with extra flour—this dough sticks like glue. Instead of wet hands, use a dry, floured cloth to shape it. If you’re in a pinch, wet your hands lightly first, then coat them thoroughly with flour. The goal is to avoid tearing the delicate surface, which ruins the oven spring.
Flavor customization for these flavors
Herb-Infused Variations
Add 1 tbsp fresh rosemary or thyme leaves directly to the dough during mixing for an Italian herb twist. I like using Penzeys Old Bay Seasoning (½ tsp) for a subtle seafood-friendly flavor that pairs perfectly with soups.
For a Mediterranean touch, mix in 1 tsp dried oregano and ½ tsp red pepper flakes—this combo adds warmth without overpowering the bread's natural flavor. 🌿
Garlic and Parmesan Twist
For a savory kick, stir in 2 minced garlic cloves and ¼ cup grated Parmesan cheese during the final shaping stage. This creates a bread that's perfect for garlic bread or as a base for bruschetta.
I recommend using Parmigiano-Reggiano for its rich, nutty flavor. For extra richness, add 1 tbsp butter to the dough instead of olive oil.
Sweet Variations
Transform ciabatta into a dessert bread by adding ¼ cup honey or maple syrup to the dough. For a cinnamon-raisin version, mix in 1 tbsp ground cinnamon and ½ cup raisins.
This sweetened dough works beautifully as a breakfast loaf or with a smear of cream cheese. I often use local honey from my farmer's market for a unique flavor profile.
Cheesy Ciabatta
Create a cheesy version by folding in ½ cup shredded mozzarella or fontina cheese during the final shaping. For a more decadent option, add ¼ cup shredded Gruyère along with 1 tbsp chopped walnuts.
This variation is perfect for serving with marinara sauce or as a cheesy breadsticks alternative. I like to sprinkle extra cheese on top before baking for a golden, bubbly crust.
Whole Grain Options
For a nutty, heartier bread, replace 1 cup of the high-gluten flour with whole wheat flour or spelt flour. For added texture, mix in ¼ cup chopped walnuts or pumpkin seeds.
These variations add fiber and nutrients while maintaining the bread's signature airiness. I find that whole grain ciabatta pairs wonderfully with hearty soups and stews. 🌾
Nutrition facts
Frequently asked questions
Why does my ciabatta turn out dense instead of airy?
The most common cause is underproofing—the dough didn't rest long enough. The 12-hour cold proof (or 1-2 hours at room temp) is crucial for gluten development. Also check your flour: high-gluten flour is non-negotiable for that signature open crumb. If your kitchen's dry, try covering the dough with a damp towel during proofing.
Can I make this ciabatta without a Dutch oven?
Yes! Place the shaped dough on a baking sheet and bake at 400°F for 30 minutes with a metal bowl inverted over it (to trap steam). For extra crust crispness, brush with water before baking. The texture won't be identical but will still be delicious. A pizza stone works too—just add 10 minutes to baking time.
How do I store ciabatta to keep it fresh?
Wrap cooled loaves in a clean kitchen towel (not plastic) and store at room temperature for 2-3 days. For longer storage, freeze shaped loaves (unbaked) for up to 3 months. To revive, thaw overnight and bake as directed. Never refrigerate—it makes the bread stale faster. The crust stays crispy for 1 hour after baking.
What's the secret to those perfect air pockets?
The magic happens during the stretch-and-fold technique—gently pulling and folding the dough 3-4 times creates tension that opens up during baking. Also, the high hydration (70%) and long proofing time allow gluten strands to relax and form those signature holes. Don't skip the 1-hour rest after mixing either—this relaxes the gluten for better oven spring.
Can I make ciabatta in a stand mixer?
While possible, I don't recommend it—ciabatta's low gluten development requires gentle handling. Overmixing with a stand mixer can toughen the dough. For best results, stick to the shaggy mix method by hand. If you must use a mixer, use the dough hook on low speed (2) for 1-2 minutes just to combine ingredients, then let it rest.